How to display list of items in Android


Lists are one of the most widely used features in apps. Android provides ListView and RecyclerView to address this requirement. With ListView we can only display data in a vertically scrollable format, whereas with RecyclerView we can display data in vertical, horizontal and grid format.
Let us understand each of them in detail.
ListView
What is ListView?
ListView is a collection of views displayed one below the other in a vertically scrollable manner. ListView depends on an adapter object to access and display the data. At runtime, the adapter acts as a bridge between the UI element and the data source. It converts each data item in the dataset into a view, which is then displayed as a list on the screen.
Steps to use ListView in your code
Step1: Include the ListView item in the XML file
<ListView
    android:id="@+id/lv_user_list"
    android:layout_width="match_parent"
    android:layout_height="match_parent"/>
Step2: Create a layout resource file for the list items
<?xml version="1.0" encoding="utf-8"?>
<LinearLayout xmlns:android="http://schemas.android.com/apk/res/android"
    android:orientation="vertical"
    android:layout_width="match_parent"
    android:layout_height="match_parent">

  <TextView
        android:id="@+id/tv_user_id"
        android:layout_width="match_parent"
        android:layout_height="wrap_content"/>

    <TextView
        android:id="@+id/tv_user_name"
        android:layout_width="match_parent"
        android:layout_height="wrap_content"/>

</LinearLayout>
Step 3: Create an adapter object. In this example, a custom ArrayAdapter is used because the data set is stored as a collection. Depending on the type of data and requirement we can use BaseAdapter, CursorAdapter etc.
public class UserAdapter extends ArrayAdapter<User> {

    public UserAdapter(Context context, int resource, ArrayList<User>   userList) {
        super(context, 0, userList);
    }
    @Override
    public View getView(int position, View convertView, ViewGroup parent) {
   //check if the existing view is being reused, if not, inflate the view.
        View listView = convertView;
        if (listView == null) {
            listView = LayoutInflater.from(getContext()).inflate(R.layout.list_item, parent, false);
        }
        //get the current user
        User currentUser = getItem(position);
        //Find the views from list_item.xml
        TextView userName = listView.findViewById(R.id.tv_user_name);
        TextView userId = listView.findViewById(R.id.tv_user_id);
        //Set these views with the data stored in the currentUser object
        userName.setText(currentUser.getUserName());
        userId.setText(currentUser.getUserId());

        return listView;
    }
}
Step 4: Then use the adapter by instantiating it in the Main Activity.
public class MainActivity extends AppCompatActivity {
    @Override
    protected void onCreate(Bundle savedInstanceState) {
        super.onCreate(savedInstanceState);
        setContentView(R.layout.activity_main);
        //Define arrayList and store the data
        final ArrayList<User> users = new ArrayList<User>();

        users.add(new User("Sundar", 1001));
        users.add(new User("Satya", 1010));
        users.add(new User("Mark", 1012));
        users.add(new User("Geeta", 1014));
        users.add(new User("Manisha", 1016));
        users.add(new User("Shefali", 1018));
        users.add(new User("Sanvi", 1020));
        users.add(new User("Sandhya", 1022));

//Instatiate the custom adapter to create the list item for each user in the dataset
        UserAdapter adapter = new UserAdapter(this, 0, users);
        ListView userList = findViewById(R.id.lv_user_list);
        userList.setAdapter(adapter);
    }
}
Step 5: Run the app and it displays the list as below.

RecyclerView
What is RecyclerView?
RecyclerView is an advanced version of ListView. It is a ViewGroup that holds the views corresponding to the underlying data. View elements are arranged in the LayoutManager, which gives the flexibility to show the data in horizontal, Vertical, expandable or grid scrollable format. As the name suggests RecyclerView recycles the views, which helps in the optimal utilization of resources, thereby making it an ideal choice for displaying a large chunk of scrollable data.
How to use RecyclerView in the code?
Let us take the same example of User Name and Ids. We will also add an image for the user in this example.
Step 1: Create the XML files.
Add the RecyclerView view group in the XML layout file.
<?xml version="1.0" encoding="utf-8"?>
<LinearLayout xmlns:android="http://schemas.android.com/apk/res/android"
    xmlns:app="http://schemas.android.com/apk/res-auto"
    xmlns:tools="http://schemas.android.com/tools"
    android:layout_width="match_parent"
    android:layout_height="match_parent"
    android:padding="16dp"
    tools:context=".MainActivity">

    <androidx.recyclerview.widget.RecyclerView
        android:id="@+id/rv_user_list"
        android:layout_width="match_parent"
        android:layout_height="wrap_content"
        app:layoutManager="androidx.recyclerview.widget.LinearLayoutManager"/>

</LinearLayout>
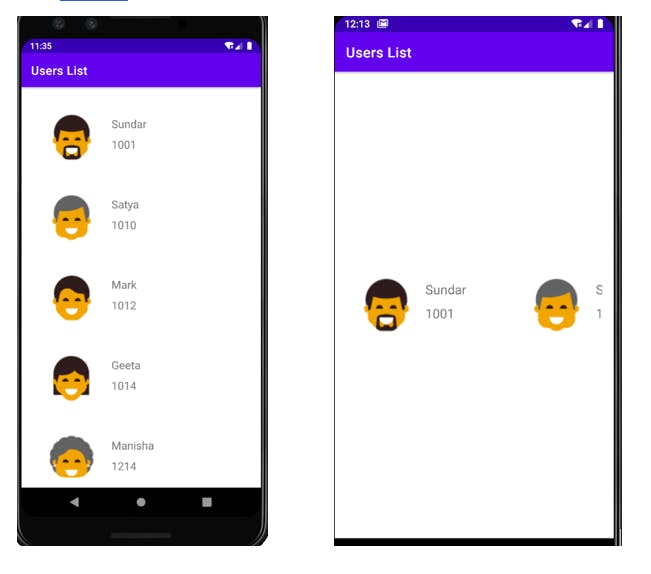
Note: For horizontal orientation, set the "orientation" and "scrollbar" attributes as “horizontal” as shown below.
<androidx.recyclerview.widget.RecyclerView
    android:id="@+id/rv_user_list"
    android:layout_width="match_parent"
    android:layout_height="wrap_content"
    android:orientation="horizontal"
    android:scrollbar="horizontal"
    android:layout_gravity="centre"
    app:layoutManager="androidx.recyclerview.widget.LinearLayoutManager"/>
Next, we need to define the items which we want to display inside the recycler view. For this, create a resource file(list_item.xml) containing the items.
<?xml version="1.0" encoding="utf-8"?>
<RelativeLayout xmlns:android="http://schemas.android.com/apk/res/android"
    android:layout_width="match_parent"
    android:layout_height="match_parent"
    android:orientation="vertical"
    android:padding="16dp">

    <ImageView
        android:id="@+id/iv_user_photo"
        android:layout_width="100dp"
        android:layout_height="100dp"
        android:scaleType="centerCrop" />

    <LinearLayout
        android:id="@+id/user_name_layout"
        android:layout_width="match_parent"
        android:layout_height="100dp"
        android:layout_toRightOf="@+id/iv_user_photo"
        android:orientation="vertical"
        android:padding="16dp">

        <TextView
            android:id="@+id/tv_user_name"
            android:layout_width="match_parent"
            android:layout_height="0dp"
            android:layout_weight="1"               android:textAppearance="@style/ShapeAppearance.Material3.Corner.Medium" />

        <TextView
            android:id="@+id/tv_user_id"
            android:layout_width="match_parent"
            android:layout_height="0dp"
            android:layout_weight="1"            android:textAppearance="@style/ShapeAppearance.Material3.Corner.Medium" />

    </LinearLayout>
</RelativeLayout>
Step 2: Define the Adapter
package com.spcreations.listviewexample;

import android.view.LayoutInflater;
import android.view.View;
import android.view.ViewGroup;
import android.widget.ImageView;
import android.widget.TextView;

import androidx.recyclerview.widget.RecyclerView;

import java.util.ArrayList;

public class UserListAdapter extends RecyclerView.Adapter<UserListAdapter.UserViewHolder> {

    public ArrayList<User> mUserList;

    public static class UserViewHolder extends RecyclerView.ViewHolder {

        public TextView mUserName;
        public TextView mUserId;
        public ImageView mImageId;

        public UserViewHolder(View itemView) {
            super(itemView);

            mUserName = itemView.findViewById(R.id.tv_user_name);
            mUserId = itemView.findViewById(R.id.tv_user_id);
            mImageId = itemView.findViewById(R.id.iv_user_photo);
        }
    }

    public UserListAdapter(ArrayList<User> userList) {
        mUserList = userList;
    }


    public UserListAdapter.UserViewHolder onCreateViewHolder(ViewGroup parent, int viewType) {
        View v = LayoutInflater.from(parent.getContext()).inflate(R.layout.list_item, parent, false);
        UserViewHolder userViewHolder = new UserViewHolder(v);
        return userViewHolder;
    }

    @Override
    public void onBindViewHolder(UserListAdapter.UserViewHolder holder, int position) {

        User currentUser = mUserList.get(position);

        holder.mUserName.setText(currentUser.getUserName());
        holder.mUserId.setText(currentUser.getUserId());
        holder.mImageId.setImageResource(currentUser.getUserImageId());

    }

    @Override
    public int getItemCount() {
        return mUserList.size();
    }
}
Step 3: Update the logic in the MainActivity file.
public class MainActivity extends AppCompatActivity {

    private RecyclerView mRecyclerView;
    private RecyclerView.Adapter mAdapter;
    private RecyclerView.LayoutManager mlayoutManager;


    @Override
    protected void onCreate(Bundle savedInstanceState) {
        super.onCreate(savedInstanceState);
        setContentView(R.layout.activity_main);

        //Define arrayList and store the data

        final ArrayList<User> users = new ArrayList<User>();

        users.add(new User("Sunder", 1001,R.drawable.sundar));
        users.add(new User("Satya", 1010,R.drawable.satya));
        users.add(new User("Mark", 1012,R.drawable.mark));
        users.add(new User("Geeta", 1014,R.drawable.geetha));
        users.add(new User("Manisha", 1214,R.drawable.manisha));
        users.add(new User("Shefali", 1018,R.drawable.shefali));
        users.add(new User("Sandhya", 1020,R.drawable.sandhya));
        users.add(new User("Vivek", 1022,R.drawable.vivek));

        //Assign recyclerView item from the layout to the variable
        mRecyclerView = findViewById(R.id.rv_user_list);
        //If the size of the view element is not going to change then set the below variable for
        //improved performance.
        mRecyclerView.setHasFixedSize(true);
        //Initialize adapter and layoutmanager
       mlayoutManager = new LinearLayoutManager(this);
        mAdapter = new UserListAdapter(users);

        //Set the layoutmanager and adapter
        mRecyclerView.setLayoutManager(mlayoutManager);
        mRecyclerView.setAdapter(mAdapter);


    }
}
Note: For horizontal layout, change the line initializing the layout manager as below.
mlayoutManager = new LinearLayoutManager(this,LinearLayoutManager.HORIZONTAL,false);
To make the scroll in the reverse direction, we need to set the reverse layout parameter to true as below.
mlayoutManager = new LinearLayoutManager(this,LinearLayoutManager.HORIZONTAL,true);
Step 4: Run the app and see the outputs as shown below.